10 Proven Tips on How to Use Sales Navigator for Lead Generation

You're probably staring at your Sales Navigator dashboard right now, wondering why this "powerful" tool isn't filling your pipeline with qualified leads.
Trust me, I know the feeling. I spent countless hours clicking through LinkedIn profiles and sending connection requests that led nowhere. Then I discovered a systematic approach that made Sales Navigator work for lead generation. The real trick isn't random searching and hoping to get lucky - it's following a proven system that delivers results.
These 10 practical tips will show you how to use Sales Navigator for lead generation. My strategies will help you turn Sales Navigator into your personal lead-generation machine, whether you're having trouble finding prospects or need a quicker way to prospect. No fluff, no complicated jargon - just simple steps that have worked for me and my clients.
Set Up Your Sales Navigator Profile for Success
Image Source: LinkedIn Business
A solid foundation paves the way to success with Sales Navigator. Setting up your profile is similar to building a house - you need to get the simple things right before everything else falls into place.
Profile Optimization Tips
Your LinkedIn profile creates your first digital impression. Research shows that successful sellers devote substantially more time to profile optimization. Here are proven tips that work:
- Create a compelling headline (up to 200 characters on desktop)
- Add a professional photo and detailed summary
- Include current position and achievements
- Request recommendations from colleagues
- Highlight relevant skills and expertise
Setting Sales Preferences
The right preference settings can transform your prospecting efficiency. Recent data reveals that 82% of top-performing sellers (those reaching 150% or more of quota) take time to research their prospects thoroughly before reaching out.
Preference Type
What to Configure
Sales Filters
Geography, Industry, Function
Lead Alerts
Career changes, News mentions
Account Updates
Headcount growth, Funding events
Email Notifications
Saved search alerts, Profile views
Creating a Professional Brand
A professional brand goes beyond appearances - it helps you establish authority in your field. Studies show that buyers are 65% more likely to involve themselves with new connections who have a strong professional presence.
Your brand becomes more effective when you define your purpose and target audience first. This clarity helps you create content that strikes a chord with ideal prospects. Regular sharing of industry insights and network engagement keeps your profile active and visible to potential leads.
Many sellers believe business skills are their only relevant content. But sharing your passions and interests makes you more relatable and builds stronger connections with prospects.
Master Advanced Search Filters
Image Source: LinkedIn Business
At the time I first started using Sales Navigator, its search capabilities overwhelmed me. These days, I'm excited to share how I use its powerful advanced search features that include over 50+ specific attributes and parameters.
Boolean Search Techniques
Boolean search serves as the secret weapon for precise targeting. The process works like building blocks - you combine keywords with operators like AND, OR, and NOT to create laser-focused searches. This guide shows my preferred Boolean operators:
Operator
Use Case
Example
AND
Include multiple terms
"accountant AND finance AND CPA"
OR
Alternative terms
"sales OR marketing OR advertising"
NOT
Exclude terms
"VP NOT (assistant OR SVP)"
Geographic and Industry Filters
Sales Navigator's extensive filtering system makes it truly powerful. The platform allows targeting companies in various continents, regions, or specific cities. My experience with access to 413 industries has taught me to combine these filters to create highly targeted searches.
Pro tip: The best approach starts with broader geographic regions before narrowing down based on response rates. This strategy helps identify the most receptive areas to outreach.
Saved Search Strategies
My prospecting changed completely when I discovered you can save up to 15 lead searches and 15 account searches. Email alerts for saved searches ensure LinkedIn notifies me when new prospects match my criteria.
The combination of saved searches with other filters proves to be a game-changer. Healthcare provider targeting becomes more effective by using geographic and industry filters to find leads in specific areas or types of care. This method has significantly improved my lead quality and response rates.
Note that the true power lies not just in having these filters but in their combination. The process typically begins with an ideal customer profile, followed by layering filters until finding the sweet spot between lead quantity and quality.
Image Source: CoPilot AI
I found that there was building strategic lead lists works just like organizing a well-oiled sales machine. Let me share how I became skilled at this significant part of Sales Navigator that streamlines my prospecting efforts.
Lead List Organization
Sales Navigator's strength comes from knowing how to create custom lists that do more than just store contacts. These lists actively track my leads' activities and send me live updates about job changes, content sharing, and other most important events.
My list organization method optimizes efficiency:
List Type
Purpose
Custom Lists
Daily prospecting and prioritization
Shared Lists
Team collaboration and lead sharing
Recommended Leads
AI-suggested prospects (up to 100)
New Executives
Track CXO/VP movements
Lead Segmentation Tips
Segmentation plays a vital role to customize outreach. My approach centers on three main criteria:
- Geographic: Target specific regions or cities
- Sociodemographic: Company size, industry, and roles
- Psychographic: Challenges, needs, and pain points
This layered approach helps create highly specific segments that enable precise targeting of the most relevant prospects for my business.
List Management Best Practices
Experience and testing helped me develop these proven practices:
- Monitor Lead Activity: The Outreach Activity column needs regular checks to track connection requests and responses. This helps prioritize warm leads and follow up effectively.
- Set Up Alerts: Notifications for important updates like job changes, news mentions, and content sharing need configuration. This keeps me informed about potential chances to connect.
- Regular List Maintenance: My lists get updates based on engagement levels, and inactive leads are removed. Custom Lead Lists have become my preferred tool to track communication status and prioritize upcoming leads.
Note that these lists serve as dynamic tools that help you stay ahead in your prospecting game. Regular reviews and updates ensure no chance slips by to connect with potential clients.
Leverage TeamLink for Warm Introductions
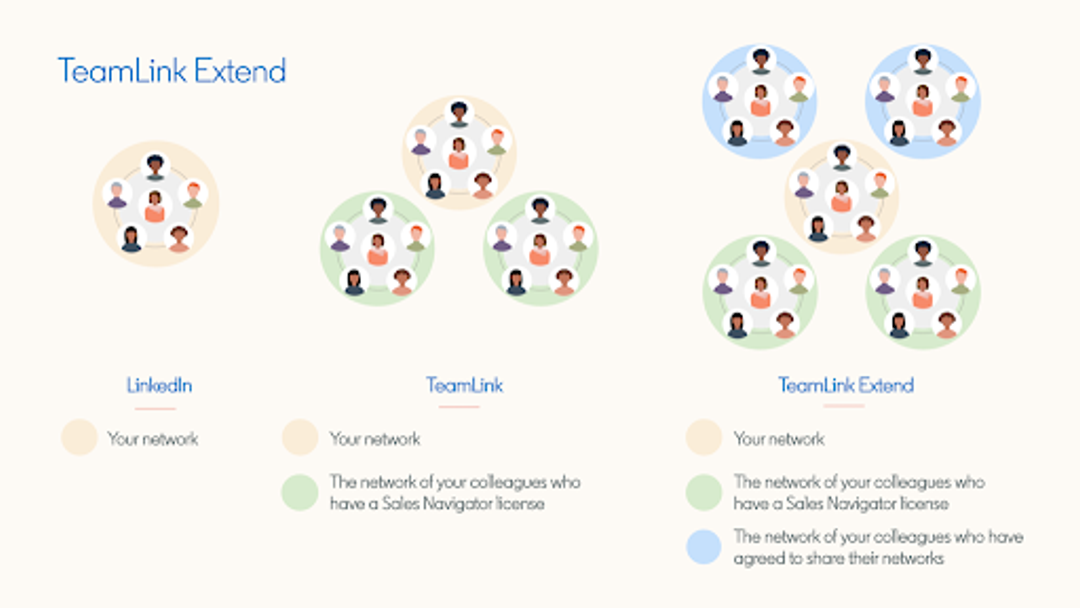
Image Source: LinkedIn
TeamLink has transformed my sales prospecting experience. It works like a secret network of warm introductions right at your fingertips, and I'm thrilled to show you how to make it work best.
TeamLink Setup Guide
TeamLink comes enabled by default in Sales Navigator Advanced and Advanced Plus accounts. The real value emerges when you expand your network through TeamLink Extend. This feature lets you tap into your colleagues' connections without giving them full Sales Navigator access.
These TeamLink capabilities stand out:
Feature
Benefit
Team Network Access
View first-degree connections of all team members
Automatic Growth
Network expands as your sales team grows
Cross-Contract Access
Connect multiple contracts for broader reach
Executive TeamLink
Special access to executive-level connections
Finding Mutual Connections
Research shows that 20% of your supporters can drive 80% of highly influenced referrals. The "connections of" filter helps me find multiple potential introductions simultaneously. This method helps me spot warm paths to decision-makers quickly.
Making Warm Introductions
My proven approach has brought great results. The secret lies in being strategic and respectful. Here's my process:
- State Clear Intent: I explain how I plan to help solve the prospect's problems
- Provide an Out: Give colleagues the option to decline or suggest alternatives
- Make It Easy: Include a pre-written message they can forward
- Follow Up Timing: Wait 48-72 hours before sending a gentle reminder
A valuable tip I've picked up involves using the "changed jobs in the last 90 days" filter to find new executives at your company. These executives often make introductions more readily since they're invested in the company's success.
Note that successful referrals work both ways. I always offer introductions in return. This practice helps build stronger relationships within my network and boosts my success rate with warm introductions.
Craft Engaging InMail Messages
Image Source: LinkedIn
My experience with Sales Navigator has taught me that crafting the perfect InMail message combines both art and science. Let me share what actually works, based on data and personal results.
InMail Templates That Work
Brevity proves to be your best friend with InMail messages. Messages under 400 characters receive 22% higher response rates than longer ones. The RABT formula consistently delivers results:
Component
Description
Reason
State why you're reaching out
Ask
Include a specific question
Backup
Support with relevant data
Tease
Hint at your solution
Personalization Strategies
Data shows that personalized InMails perform 15% better than generic messages. These strategies make each message count:
- Reference recent company updates or achievements
- Mention mutual connections or shared interests
- Acknowledge specific challenges in their industry
- Include their name, company, and role naturally
Showing that you've done your homework matters. Value-focused outreach works better than immediate sales pitches.
Follow-up Techniques
LinkedIn doesn't allow direct InMail follow-ups, so a multi-channel approach works best. A 48-72 hour waiting period before following up through email or regular LinkedIn messages proves effective.
Content engagement serves as an excellent bridge. Engaging with the prospect's content for a week or two before sending an InMail helps. This way, they recognize your name when your message arrives.
Note that your InMail competes with dozens of others in their inbox. Short messages under 400 characters improve response rates and force clarity. Your message should prioritize their needs since 90% of decision-makers never respond to cold outreach.
Use Content Engagement for Prospecting
Image Source: LinkedIn
Content engagement has become my secret weapon in Sales Navigator prospecting. My success rate shot up when I started sharing valuable insights, and now I want to tell you about the strategies that worked for me.
Content Sharing Strategy
Sales professionals who keep sharing content are 45% more likely to exceed their quota. This is my content sharing structure:
Content Type
Purpose
Industry Insights
Establish expertise
Market Reports
Demonstrate knowledge
Success Stories
Build credibility
Intellectual Influence
Position as advisor
The magic lies in consistency. Each week, I set aside time to curate and share content that tackles my prospects' specific challenges.
Engagement Tactics
My approach to engagement goes beyond posting content. These targeted strategies have led to a 7x higher response rate:
- Comment thoughtfully on prospects' posts
- Share relevant insights on their updates
- Participate in their company news
- Monitor buyer intent signals through content interaction
Several times a week, I review my warm prospect list. This helps me add value through meaningful interactions instead of sending generic follow-ups.
Building Authority
You don't build authority by flooding your network with content - it's about smart positioning. LinkedIn's research shows that 32% of buyers review a seller's shared content before they decide to reach out.
My focus stays on sharing industry insights that show I understand my prospects' challenges. This approach helps me build credibility and stay relevant to target accounts. Prospects see me as a trusted advisor rather than just another salesperson when I consistently share valuable content and contribute meaningfully to industry discussions.
Pro Tip: Sales Navigator's alerts help me track my prospects' latest activities and company news. This perfect timing makes my content sharing and engagement more relevant and meaningful.
Track Lead Activity and Alerts
Image Source: LinkedIn
You need to keep track of your prospects' activities to time your outreach just right. Sales Navigator's alert system helped me revolutionize my lead generation process, and I want to show you how to do it too.
Setting Up Lead Alerts
Sales Navigator's complete alert system makes it powerful. I set up my alerts to let me know about everything from job changes to news mentions. Here's how I make the most of my alert settings:
Alert Type
Purpose
Lead News
Track mentions in news
Job Changes
Monitor career moves
Content Sharing
View chances to connect
Profile Views
Identify interested prospects
Buyer Intent
Track engagement with company page
Monitoring Engagement
My careful monitoring works like a radar that picks up signals you might miss otherwise. Each week, I follow this routine:
- I look at bookmarked alerts (they stay visible for 60 days)
- I check the "All alerts" tab for latest updates
- I filter alerts based on what's relevant or recent
The mobile app has become my secret weapon. I can respond right away when a saved lead looks at my profile or shares content, which helps me make better connections.
Taking Action on Updates
Sales success depends on timing. Quick and relevant responses to alerts boost engagement rates by a lot. I make it a priority to reach out to leads who show high engagement with our company page or website when I get buyer intent alerts.
The "Recently Viewed Lead" feature helps me find and save profiles that match my ideal customer profile. I use this with TeamLink insights to find warm introduction paths, which makes my outreach more personal and effective.
Pro Tip: The LinkedIn insight tag on our website tells me when prospects visit our company website. This gives me another valuable way to connect with them.
Image Source: Microsoft Learn
My prospecting reached new heights when I combined Sales Navigator with my CRM after becoming skilled at lead tracking and alerts. Let me share how this combination revolutionized my sales process.
CRM Integration Benefits
Time savings stand out as my biggest gain. According to Forrester, Sales Navigator saves each salesperson 15 minutes per day, which leads to an average productivity savings of £1.91 million over three years. The integration offers these advantages:
- Unified platform for lead management
- Up-to-the-minute data synchronization
- Automated activity logging
- Improved team collaboration
- Better data accuracy
Sync Settings
The right sync configuration makes a vital difference in maximizing efficiency. My optimal sync settings include:
Sync Feature
Purpose
Impact
Auto-save Leads
Automatic list creation
Time savings
Data Validation
Keep contacts current
Accuracy
Activity Writeback
Log interactions
Compliance
Smart Links
Track engagement
Lead scoring
Major platforms like Microsoft Dynamics and Salesforce combine smoothly with the CRM sync, and HubSpot integration is coming soon. Pro tip: You can save more time by enabling automatic logging of InMails and messages.
Data Management
Data management plays a vital role in my success. The integration imports and processes Opportunity, Task, Contact, Account, and Lead data from the CRM automatically. The system updates every 12 hours, which keeps my data current and reliable.
Proper data management extends beyond record-keeping to support informed decision-making. My CRM data stays accurate because the system verifies contacts and allows direct updates from Sales Navigator. This approach has cut down manual data entry time and streamlined my prospecting process.
The system's ability to instantly record Sales Navigator activities in my CRM proves invaluable. Each InMail, message, phone call, and note gets logged automatically. This keeps my team synchronized and ensures we catch every opportunity.
Image Source: LinkedIn
My Sales Navigator dashboard amazes me today. Tracking the right metrics has reshaped my prospecting success. Let me share the performance indicators that matter and how I measure them.
Key Performance Indicators
Sales Navigator success depends on tracking specific metrics that generate results. Forrester's research shows Sales Navigator delivers an impressive 312% ROI over three years. These are my key metrics:
Metric Type
What to Track
Activity Metrics
Profile views, searches performed
Engagement Metrics
InMail acceptance rate, connection rate
Lead Metrics
Saved leads, account growth
SSI Score
Professional brand, network strength
ROI Measurement
Numbers tell the real story - I've seen how measuring ROI validates your Sales Navigator investment. Users see an 8% increase in revenue each year that grows to 10% revenue growth by year three. The 15% boost in sales research efficiency stands out even more.
My top ROI indicators include:
- Number of decision-maker connections (5.83x increase for enterprise accounts)
- Deal size growth (44% for SMBs in tech sector)
- Sales opportunities (31% increase for targeted accounts)
Optimization Tips
Experience has taught me that monitoring lead interaction frequency is vital. I focus on:
- InMail response effectiveness - acceptance rates help me improve my messaging
- Sales pipeline efficiency - quick movement of leads through stages
- Lead conversion rates - best performing lead sources
The Usage Reporting dashboard helps me track these metrics daily and displays everything from days active to SSI scores. Setting up ROI reporting with my Relationship Manager adds significant value by measuring each interaction's impact.
Note that these metrics reveal patterns that refine my approach. My focus on these key indicators has improved my prospecting results and maximized my Sales Navigator investment.
Image Source: Expandi
I found that automation has changed how I use Sales Navigator to generate leads. Manual prospecting still works, but mixing automation with a personal approach creates the perfect balance to scale outreach.
Automation Tools
My tests with different solutions show that automation can increase lead generation by up to 60%. Here's how I group the most useful tools:
Automation Type
Primary Use
Key Benefit
Browser-based
Profile visits & connections
Quick setup
Cloud-based
Message sequences
Scale outreach
Desktop-based
Data extraction
Local control
Workflow Setup
My systematic approach to automation keeps messages personal while scaling efforts. The workflow handles profile visits, connection requests, and follow-ups automatically within LinkedIn's guidelines.
Setting up automated sequences that pre-program follow-ups with custom variables like names, company names, and industries has been a game-changer. This helps me keep messages personal even at scale.
Time-saving Tips
My trial and error led me to several automation strategies that boost efficiency:
- Save search URLs in Chrome favorites to access lead lists quickly
- Extract leads into CSV files with automation tools for bulk processing
- Set up smart inbox management to track responses
- Keep CRM data current with automatic profile enrichment
Automation tools can gather metrics on LinkedIn performance automatically - one of my best finds. This saves hours of manual tracking and ensures I catch every chance to engage.
The real success with automation comes from building a system that boosts rather than replaces personal interaction. When automation handles repetitive tasks like profile visits and first connections, I can focus on meaningful conversations that close deals.
Note that automation needs to follow LinkedIn's terms of service. I keep my automation settings within suggested limits to protect my account while getting the most out of it.
Comparison Table
Tip
Key Features/Components
Benefits/Impact
Best Practices
Notable Statistics
Set Up Profile for Success
Profile optimization, Sales priorities, Professional branding
Better first impression, Enhanced prospecting efficiency
Write a compelling headline, Add professional photo, Ask for recommendations
82% of top performers research thoroughly before outreach
Become Skilled at Advanced Search Filters
Boolean search, Geographic filters, Industry filters, Saved searches
Precise targeting, Automated lead alerts
Begin with broader searches, Mix multiple filters, Save up to 15 searches
Create Strategic Lead Lists
Custom lists, Shared lists, Recommended leads
Immediate updates, Team collaboration, Automated tracking
Maintain lists regularly, Watch lead activity, Set up alerts
Up to 100 AI-suggested prospects
Utilize TeamLink
Team network access, Cross-contract access, Executive TeamLink
Personal introductions, Extended network reach
Express clear intent, Offer pre-written messages, Follow up within 48-72 hours
20% of supporters create 80% of referrals
Write Compelling InMail Messages
RABT formula (Reason, Ask, Backup, Tease), Personalization options
Higher response rates, Better involvement
Keep messages under 400 characters, Add personal touches
22% higher response rates for messages under 400 characters
Share Valuable Content
Industry insights, Market reports, Success stories
Build expertise, Enhance credibility
Share content regularly, Add thoughtful comments, Watch buyer intent
45% more likely to exceed quota with regular content sharing
Monitor Lead Activity and Alerts
Lead news, Job changes, Content sharing, Profile views
Quick engagement, Spot opportunities
Check bookmarked alerts, Review "All alerts" tab, Use mobile app
Alerts visible for 60 days
Connect with CRM
Auto-save leads, Data validation, Activity writeback
Single platform, Quick sync
Enable automatic logging, Set up sync options
15 minutes saved per day per salesperson
Review Performance Metrics
Activity metrics, Engagement metrics, Lead metrics, SSI score
Track returns, Optimize performance
Check lead interactions, Monitor InMail responses
Automate Lead Generation
Browser-based tools, Cloud-based tools, Desktop-based tools
Expanded outreach, Time savings
Create automated sequences, Keep personal touch
Up to 60% increase in lead generation
Conclusion
Sales Navigator has changed how I generate leads. These 10 tips come from my years of hands-on experience. My results prove that success comes from using multiple features together - from precise search filters to smart automation - while keeping relationships real.
The numbers are impressive: Sales Navigator users get an 8% revenue increase in their first year, which grows to 10% by year three. But there's more to it than just numbers. The magic happens when you use these tools to build real connections with potential clients.
You should start small. Pick two or three tips that match what you want to achieve now. Get your profile right first. Learn to use advanced search filters. Then move into automation when you feel ready. Sales Navigator works best when you balance its powerful features with genuine human interaction.
These strategies have helped me hit my sales targets consistently. I know they'll work for you too. Taking action matters most - even small daily steps lead to big results over time.


